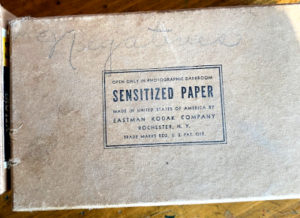
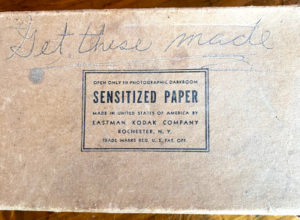
SCORE!  I got word from back home that my brother has discovered a pair of cardboard boxes from Kodak among our late father’s things, about 6x4x1.5 in. with “Sensitized Paper” printed prominently. In handwriting, almost certainly our grandmother’s, are the words “Get these made” on one box, and “Negatives” on the other.


I am extremely excited to find out what is in the boxes.  I am leaning towards them being filled with processed negatives, based on the handwritten label, but since it’s not clear, I asked that the boxes be put in lightproof plastic bags to be safe.  

My hope is that these are previously unprinted images, or at least clear negatives from which clean prints or scans can be made, but it’s pointless to speculate until they can be safely opened.  They may well be undeveloped film. They may be damaged beyond use. They may contain recipe cards, movie ticket stubs or WWII chocolate rations, I have no idea.

In any case, once I can travel back and get them, if they are in fact processed negatives, I can scan them to high res images, and I really cannot wait until that happens…

I enjoy seeing the creative ways that minimum-budget photographers approach problems such as lighting, space limitations, basic equipment and editing, yet remain creative and produce fantastic work.

When I decided to move away from the more automated settings on my Canon and try the semi- and full-manual modes, I realized I had to learn to think differently not only about how I was photographing, but also how to achieve the effects of standard equipment I didn’t already own.  

First of these was a softbox – basically, fabric enclosure for a flash, strobe or constant light source, sometimes umbrella-shaped, with a reflective interior and a diffusion fabric front panel which spreads the light out over a wide area, softening the shadows and highlights, making for a more less harsh, shadow-filling light.

Although not (usually) crazy expensive, the prosumer models can be a bit pricey.  Now, I only have a single Speedlite, and was limited to using just that on top of the camera. Soon I bought a Cowboy Studios radio flash shoe adapter, which at least gave me the flexibility to move the flash off of the camera and get a little more use out of it that way.

However, the flash light source itself was still small, which made highlights rather specular and the shadows sharp.  I could bounce the flash off the walls or ceiling, but I still needed to get the light directional as well as diffuse.

So, I shelled out $10 for a couple of yards of diffusion material. Items I already had on hand were:

Matte board left over from some picture framing project years ago,
Tin foil
Electrical tape
A sheet of 5/8-in thick spongy plastic packing material

I got out my X-Acto knife and got to work. I cut 4 angled sides, removing the centers to mimize weight, lined one side of each with tin foil (for internal reflection and prevent light escaping), taped the seams with electrical tape, and then cut an aperture out of the packing material to slip over the flash head (I doubled it, as at 1 1/4 inch thick, it would hold onto the speedlite head better). Then I taped a rectangle of the diffusion material over the front, and viola!

Granted the front of the softbox is only 8×10 inches, but that’s much better than the 1 1/4 x 2 1/2-inch flash. It’s not collapsable, but it’s lightweight, small enough to be carried from place to place, and does a great job for a hobbyist.

My current project is a ring flash, using a small beach pail and a Solo party cup. No, really. It’s in progress. More on how that comes out later.  Oh! And it’s okay to keep project remnants “just in case”.  They will come in handy one day!


BTW, I will be adding photos to these posts eventually.
One of the daunting things about trying to find tips on learning better photography skills is the flood of viewpoints, product endorsements and the sheer terrifying cost of all the fancy gear these people seem to effortlessly acquire.

The fun part, however, is making it happen on the cheap.  I’m talkin’ tin-foil, lampshades, bedsheets, RIT dye and poster board.

More later.  I’m still putting the site up.

As I set up this site, I’m making notes on how to best present the information I have, be it photos, thoughts or genealogy info.  As for the photos and thoughts, those are all mine, so I can do with them pretty much as I please, but for family research, I think I will need to read up on what is appropriate, permissible and fair to publish.

I mean, what if it’s publicly available information on someone, but perhaps a bit sensitive for certain individuals who might not like drawing attention to it?  How freely can data on deceased individuals be shared, and does that change based on how long ago they passed away, or how?

I don’t know.  I have some ideas, but I’d like to prevent any issues rather than address their effects later.

Anyway, first blog post here. Bit of a practice warm up.

Pages vs. Posts


If you’re new to WordPress you may be wondering what’s the big deal behind Pages and Posts. At first glance they appear to be one and the same: if you were to create either a new page or a new post you’d be presented with nearly identical interfaces and in many cases the public appearance of pages and posts will look the same.

Don’t let this fool you. There’s a very fundamental difference between the two and that difference is what makes CMSs, like WordPress, great platforms for integrating blogs with traditional websites.

Pages

Think about the kind of pages that make up a typical website. Most often you’ll see pages like “Home”, “About Us”, “Services”, “Contact Us”, etc. Within WordPress these are often treated as Pages; documents that have no particular regard for the time they were posted.

For example, when you visit the “About Us” page of your favorite company’s website you don’t expect the content to be very different from what was available there a week ago.

Read more >

Categories and Tags

If you write about a variety of subjects, categories can help your readers find the posts that are most relevant to them. For instance, if you run a consulting business, you may want some of your posts to reflect work you’ve done with previous clients, while having other posts act as informational resources. In this particular case, you can set up 2 categories: one labeled Projects and another labeled Resources. You’d then place your posts in their respective categories.

Read more >